Operating Instructions
Need a new Instruction Sheet? Download this PDF and print a new one.
General
 The three 1.5 volt batteries (LR-44) are already installed. To replace batteries you can use LR-44, GPA76, AG13, G14A or A347 batteries. Either a mill collet or drill chuck is required to use the unit.
If you are using a drill chuck, here are some helpful hints on using our tool. Because the jaws of a drill chuck can get badly damaged during use, it is hard to align our tool repeatedly by simply inserting it in the chuck. To help alleviate the problem, when you first align the tool in the drill chuck, place a felt tip mark on both the tool and the drill chuck so that you can put the tool back in the same place each time you use it. This gives you a better chance of keeping it accurate.
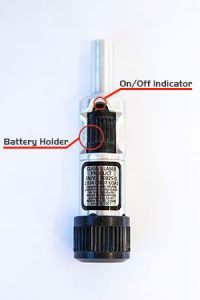
Once the Laser Center/Edge Finder ® is installed in the mill, apply thumb pressure, slightly downward, to the black Battery Holder/On-Off switch and rotate in either direction. The white mark should be facing out when it is on. Do not turn upside down and look at the light source. Move the table until the laser light is showing down the edge of the material, or to find a center punch mark, move the table until the light is in the center of the center punch mark. Rotate the polarizer to make the dot smaller until it is in the center of the center punch mark. This is the Direct Method. No more slightly touching the edge of the old center finder and then moving the table an additional amount, the Indirect Method.
Alignment
Every unit is aligned after assembly. However, you should check the alignment on your own machine to account for any variation in quill bearing run-out. A 5/64″ Allen wrench is provided.
Should the unit be dropped and is no longer aligned, place the unit in the mill and realign, using the adjusting screws on the nose of the unit. If you find the unit is not aligned, it is a simple matter to re-align.
- Place the tool in a chuck or mill collet and turn the tool on.
- Place the provided Laser Alignment Target card so that the + is in the center of the circle of the beam path.
- Rotate the quill by hand and note the path traced by the beam. If it is making a circle rather than remaining as a dot, it needs to be aligned.
- Rotate the quill until the screws are in a North-South, East-West position.
- Using the 5/64″ Allen wrench, loosen the North screw and tighten the South Screw, for instance, and then the East-West screws until, when you rotate the chuck, it remains a dot on the surface. The screws just need to be lightly touching the laser module to make contact.
Replacing Batteries
To replace the three batteries:
- Hold the unit NOSE UP (to prevent batteries from falling out).
- Unthread the upper and lower parts of the unit.
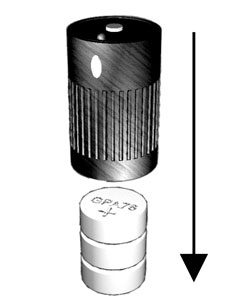
- Tip the shank end over so the batteries end up stacked on a table surface.
- Stack three new batteries on top of each other (NUMBERS UP).
- Slip the shank end down over the new batteries.
- Thread the lower nose body onto the top shank body.
Check out our Quicktime video for a full product demonstration

